- After equipment has been repaired or modified.
- When a specified time period has elapsed.
- When a specified usage (operating hours) has elapse.
- Before and/or after a critical measurement.
- After an event, for example:
a) After the equipment has had a shock, vibration, or has been exposed to an adverse condition which potentially may have put it out of calibration or damage it.
b) Sudden changes in weather.
c) Improper use of software to cause the loss of the calibration data.
- Whenever observations appear questionable or equipment indications do not match the output of surrogate instruments.
- As specified by a requirement, e.g., customer specification.
Methodology
Calibration, in general use, is often regarded as including the process of adjusting or aligning the output of or indication on the equipment to agree with value of the applied standard, within a specified accuracy.
Our BTS generally outputs and measures current and voltage. And it has different circuits for charge and discharge. So we need to calibrate a). Charge Current; b). Discharge Current; c). Charge Voltage; d). Discharge Voltage.
1, Charge Current / Discharge Current (If negative power supply installed)
Since the standard current meter generally cannot support large current, a DC shunt should be introduced for some large current calibration. You set a current value for the equipment to output, there will be a value indicated by our BTS. By below connection, there will be another value indicated by standard meter.
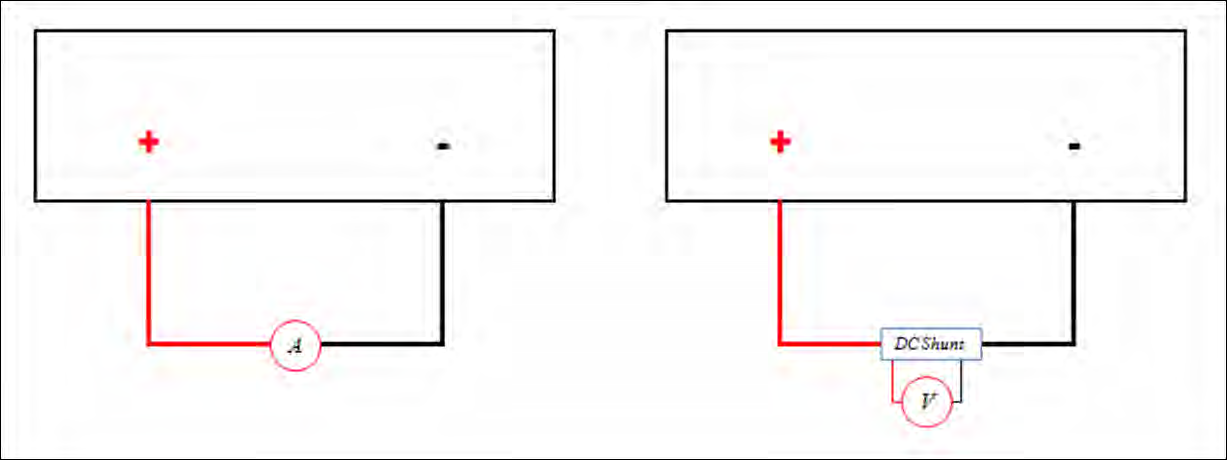
Current-Calibration-Connection-Diagram
2, Discharge Current (No negative power supply installed)
If there is no negative power supply installed, the equipment cannot discharge except you connect a battery to function as a power supply. You can calibrate discharge current at this situation just string a battery in the circuit as above diagram. You need to consider the discharge capability of the battery connected.
3, Charge Voltage
Now string a resistor in the circuit as below diagram, set constant voltage charge, this will create a voltage at the ends of the resistor. BTS will read a voltage value, and also the standard meter. These values will be taken into calculation for the calibration.

Voltage-Calibration-Connection-Diagram
4, Discharge Voltage
For the equipment with negative power supply and empowered with Constant Voltage Discharge, you can use the same logical as above calibration for charge voltage. If no such conditions, a digital voltage signal source will be introduced for the calibration.
Linearity is an important item of MSA (Measurement System Analysis). To have better linearity in whole scale, you need to calibrate more segments.
Multiply 4 items you need calibrate with the segments’ points, you get the calibration procedure matrix you need to take. This is a laborious job to complete the calibration manually. Our newly designed automated calibration system will facilitate this task.
Manual Calibration
- This calibration tool is an old version. Our latest BTS Client now has integrated calibration function. They have similar usage. Since NwCal.exe is largely used before. Below steps are based on this.
- NwCal uses RS232 or RS485 to communicate. So before you conduct the calibration work, you need to release the connection from bottom machine to middle machine, connect an RS232 cable directly from the middle machine to the host computer. If the RS232/RS485 port on the equipment is 9-pin male port, use a 9-pin RS232/RS485 wire to connect computer to the computer’s COM port. If the RS232 / RS485 on the equipment is RJ45 jack, use an adapter wire – one end is RJ45 and the other is COM port, or use an RJ45 straight through cable to black Port Adapter(if purchased) which uses USB or COM to be connected with the computer.
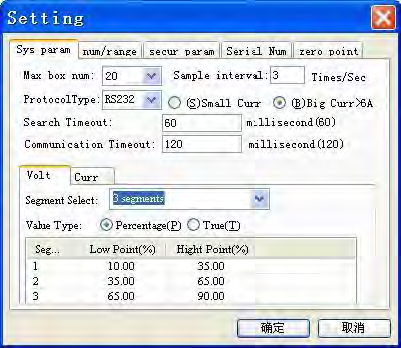
- Since models of different current ranges have different default segments for the calibration, you need to set the segments to the very correct one with the equipment you are going to calibrate. If your model has a current lower than or equal to 6A, use 1 segment, and 3 segments larger than 6A. Voltage and current will have the same segments count.
- Then you click OK and exit the program. After you connect the bottom machine to the host computer with RS232 cable, you can re-launch this program. Program will search units automatically and click Yes to load the calibration data of the connected unit.

- In the right area, there are channels listed, type of accuracy test and calibration mode for your choice, and also, if this unit is of main channel type, there will be 4 items you need to calibrate – CC (Charge Current), CV (Charge Voltage), DV (Discharge Voltage) and DC (Discharge Current). If you are calibrating current and the circuit is with shunt, you need to select Shunt choice from the Digital Multi-Meter field, and input the accurate resistance.
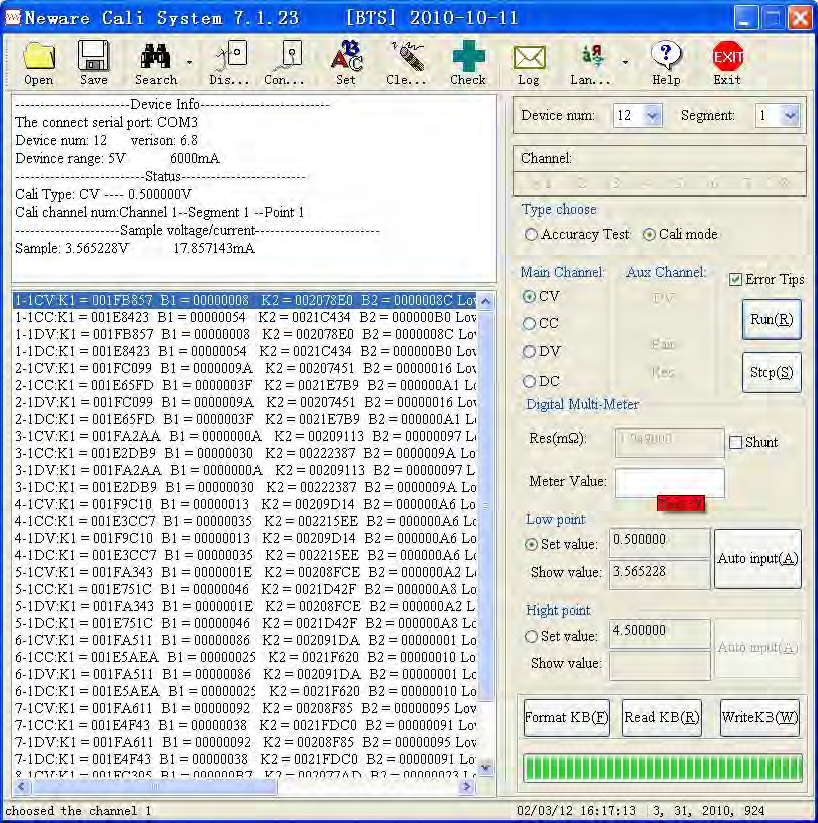
- Now, click Run will call the equipment to response the very value you set. There will be a value reading from the meter you connected – current or voltage based on the item you selected and the circuit you connected. If you choose current calibration and your circuit has a shunt stringed, you can only input the voltage readings into the Meter Value blank – program will calculate the equivalent current based on the voltage and the resistance.
- Now Click Run again, program will call the equipment to response another point of the segment. Input the value same as the above procedure. If all points for this item of the channel have been finished, program will jump to next channel for calibration. Now you can move onto next item like CC (Charge Current).
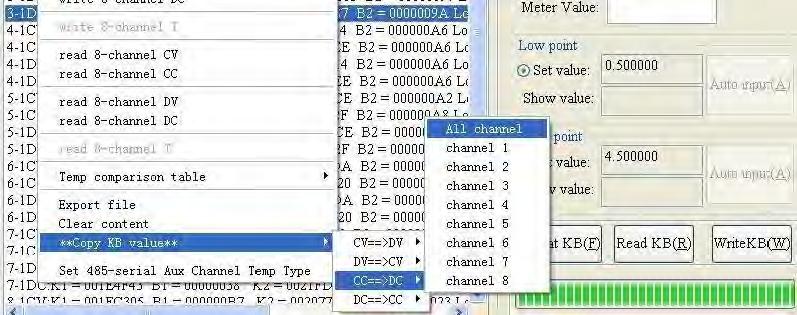
- If you do not have equipment powered with negative power supply and no available battery function as an external power source, you may choose Copy KB Value on the right click menu after you have finished CC (Charge Current) calibration. As the same, when you do not have a digital voltage signal source, you may choose Copy KB Value after you have finished CV (Charge Voltage) calibration.
- When all items of all channels have been calibrated, you now click Write KB(W) to save all the calibration data. And a restart of the equipment is necessary to make the calibration take effect.
Calibration Operation
1) Format KB(F) will format the flash, all the calibration data will go back to its original status which has poor accuracy.
2) If the value of the meter (or equivalent value) is largely different from the value readings of the equipment (Show value), you may check your circuit connection.
Auto Calibration
Our automated calibration system brings you an auxiliary hardware integrated with all necessary parts mentioned above and also software with all calibration related functions.
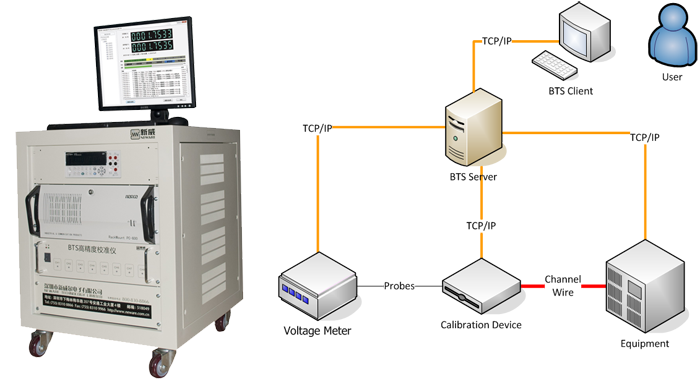
Auto Calibration System Diagram
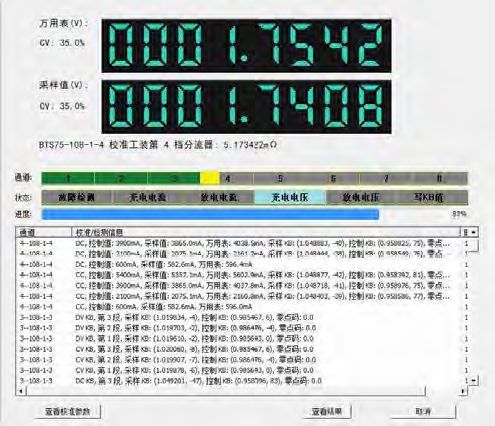
Auto-Calibration-Processing
You can choose to generate calibration reports after the completion of the calibration.
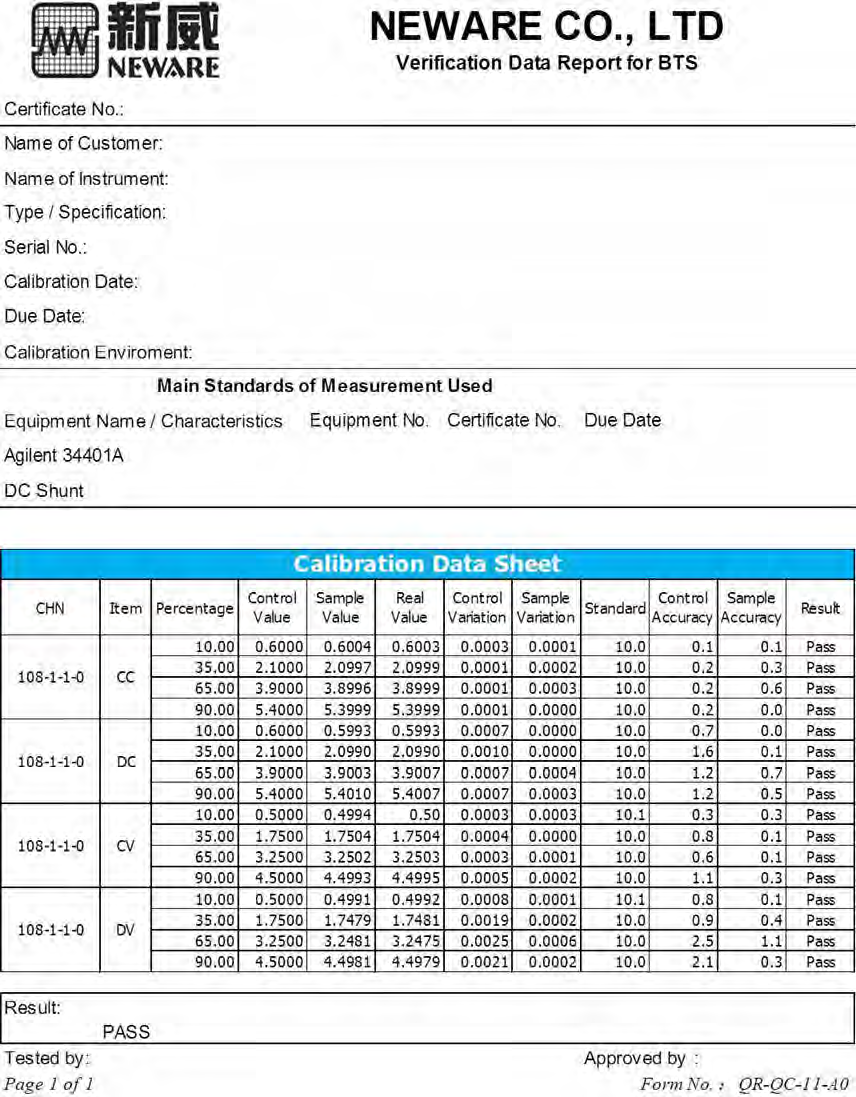
Calibration-Report